
An SSL certificate is essential for securing your website and protecting your users’ data.
Namecheap offers a range of SSL certificates to choose from, and this guide will walk you through the process of purchasing and activating an SSL certificate on Namecheap.
Types of SSL certificates available on Namecheap
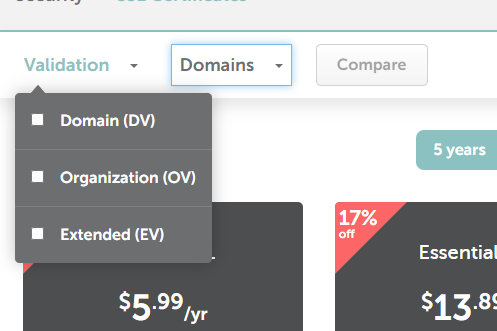
Namecheap offers a variety of SSL certificates to suit different needs and validation levels. The three main types of SSL certificates available on Namecheap are:
Domain Validation Certificates (DV)
These certificates are the most basic type and require the least amount of validation.
They are suitable for websites that do not require a high level of security, such as personal blogs or small business websites.
Organization Validation Certificates (OV)
These certificates offer a higher level of security and require more validation than DV certificates.
They are suitable for websites that handle sensitive data, such as e-commerce sites or financial institutions.
Extended Validation Certificates (EV)
These certificates offer the highest level of security and require the most extensive validation process.
They are suitable for websites that handle the most sensitive data, such as government websites or healthcare providers.
All SSL certificates offered by Namecheap provide up to 256-bit SSL encryption strength, which is supported by most modern browsers.
The certificates are issued by the CA Sectigo, which is recognized by 99% of web browsers, ensuring that browsers will not show security errors when connecting to a site secured by a Namecheap SSL certificate.
How to choose the right SSL certificate for my website on Namecheap
Choosing the right SSL certificate for your website on Namecheap depends on your website’s needs and the level of security you require.
As we’ve already seen, Namecheap offers three types of SSL certificates:
- Domain Validation Certificates (DV)
- Organization Validation Certificates (OV)
- Extended Validation Certificates (EV).
DV certificates are the most basic type and require the least amount of validation.
They are suitable for websites that do not require a high level of security, such as personal blogs or small business websites.
OV certificates offer a higher level of security and require more validation than DV certificates.
They are suitable for websites that handle sensitive data, such as e-commerce sites or financial institutions.
EV certificates offer the highest level of security and require the most extensive validation process.
They are suitable for websites that handle the most sensitive data, such as government websites or healthcare providers.
To choose the right SSL certificate for your website, consider the level of security you need and the type of website you have.
If you have a personal blog or small business website that does not handle sensitive data, a DV certificate may be sufficient.
If you have an e-commerce site or financial institution, an OV certificate may be more appropriate.
And if you handle the most sensitive data, such as government websites or healthcare providers, an EV certificate may be necessary.
Namecheap also offers Unified Communications (UC) certificates and Wildcard SSL certificates for websites that require protection for multiple domains or subdomains.
If you are still unsure which SSL certificate to choose, Namecheap’s experts can help you narrow down your search to find the perfect one for your website.
Cost of SSL certificates on Namecheap
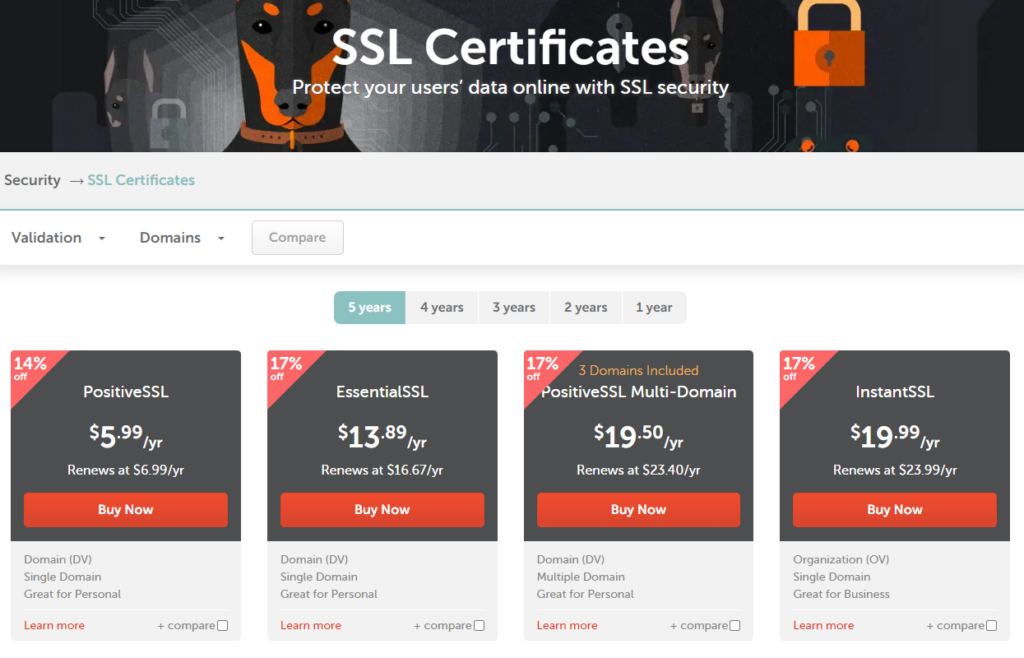
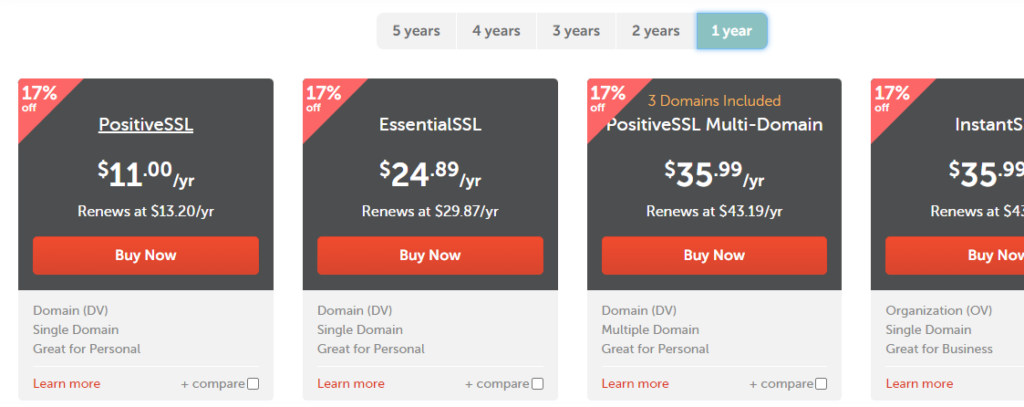
Namecheap offers a range of SSL certificates at affordable prices. The cost of SSL certificates on Namecheap varies depending on the type of certificate you choose.
| SSL Certificate Type | Price (1st Year) | Price (Renewal) |
|---|---|---|
| PositiveSSL | $5.99 | $6.99 |
| EssentialSSL | $13.89 | $16.67 |
| PositiveSSL Multi-Domain | $19.50 | $21.99 |
| Wildcard SSL | $44.39 | $95.99 |
Please note that these prices are for the first year and the renewal prices. The prices for the SSL Reseller Program are as follows:
- Level 1: $50 – $299 / Year
- Level 2: $300 – $1499 / Year
- Level 3: $1500 – $2999 / Year
- Level 4: More than $3000 / Year
These prices are subject to change, so it’s always a good idea to check the Namecheap website for the most up-to-date pricing information.
The following are the prices for the three main types of SSL certificates offered by Namecheap:
- PositiveSSL: $5.99/year (Renews at $6.99/year)
- EssentialSSL: $13.89/year (Renews at $16.67/year)
- PositiveSSL Multi-Domain: $19.50/year (Renews at $21.99/year)
Namecheap also offers Wildcard SSL certificates, which start at $44.39/year and renew at $95.99/year.
The cost of SSL certificates on Namecheap is low, making it an affordable option for website owners who want to secure their website without breaking the bank.
Namecheap also offers an SSL Reseller Program, which allows resellers to purchase SSL certificates at discounted prices.
The cost of SSL certificates for resellers varies depending on the level of the program. The SSL Reseller Program has four pricing levels, with prices ranging from $50 to more than $3000 per year.
How to Get an SSL Certificate from Namecheap: A Step-by-Step Guide
Elevate your website’s security with an SSL Certificate from Namecheap.
Affordable, easy setup for trusted encryption and customer trust.
Step 1: Purchase an SSL Certificate
- Visit the Namecheap SSL Certificates page.
- Choose the type of SSL certificate that best suits your needs: PositiveSSL, PremiumSSL, or ExtendedSSL.
- Follow the prompts to complete the purchase process.
Step 2: Activate the SSL Certificate
- After purchasing the SSL certificate, you will be redirected to a “Thank you!” page. Click the “Manage” button next to the SSL certificate.
- If you want to initiate activation later, you can find the SSL certificate in your Namecheap account panel. Navigate to Dashboard >> “SSL Certificates” tab >> your SSL certificate. Press the “Activate” button next to it.
- You will be led to a page that asks you to enter the CSR code. Double-check with your server provider on the exact certificate format necessary for installation on your server.
Step 3: Download the SSL Certificate Files
- Once the SSL certificate is issued, you can download the SSL certificate files from your Namecheap account.
- Head to the “SSL Certificates” list and click the “Download” button next to the selected SSL certificate.
- The required files are the certificate and bundle files, which will be emailed to the administrative contact email address for the domain. You can also download them from there.
- The Private key will either be located in one of two places: the hosting server where the CSR was generated or the server where the SSL certificate was installed.
Step 4: Install the SSL Certificate
- Install the SSL certificate on your server according to the instructions provided by your hosting provider or the SSL certificate issuer.
- If you host your domain name with Namecheap, you can provide them with your certificate, and they will be happy to install it for you.
how to add ssl certificate to website namecheap
To add an SSL certificate to your website hosted on Namecheap, you can follow these general steps based on the information from Namecheap’s support pages:
Activate the SSL Certificate:
- Sign into your Namecheap account and navigate to the SSL Certificates tab in the Dashboard.
- Activate your SSL certificate and ensure that you have a CSR (Certificate Signing Request) code generated on your server.
Install the SSL Certificate:
- If you host your domain with Namecheap, you can use the Namecheap SSL plugin for automatic or manual installation of the certificate.
- Alternatively, you can follow specific instructions for SSL installation based on your server type, which can be found in the Namecheap knowledge base.
Verify the Installation:
- After the installation, you can use online tools to check the SSL installation to ensure it is set up correctly.
If you prefer to use a free SSL certificate, you can also consider using Let’s Encrypt, and there are community discussions providing steps to install Let’s Encrypt SSL on Namecheap’s cPanel.
Step 5: Manage Your SSL Certificate
- After activating your SSL certificate, you can manage it in your Namecheap Account Panel.
- You can renew and reissue your SSL certificate as needed.
- Every SSL certificate issued by Namecheap comes with a site seal, which offers visual proof of the security provided by your website’s SSL certificate.
These steps can easily help you obtain and manage an SSL certificate from Namecheap, ensuring that your website is secure and your users’ data is protected.
How to obtain a free SSL certificate on Namecheap
What we’ve looked at so far involves money.
But what you don’t know is that Namecheap offers a free PositiveSSL certificate for one year on all of its Shared Hosting servers.
This certificate is installed automatically by a special Namecheap SSL plugin and works the same way for the main domain in the newly purchased hosting account.
For other types of SSL certificates, you can obtain a free SSL certificate from Let’s Encrypt and install it on Namecheap.
Let’s Encrypt is a free, automated, and open certificate authority that provides SSL certificates at no cost.
Here are the steps to obtain a free SSL certificate from Let’s Encrypt and install it on Namecheap:
- Log in to your cPanel account on Namecheap.
- Navigate to the “Security” section and click on “Let’s Encrypt SSL”.
- Select the domain you want to secure with the SSL certificate and click “Issue”.
- Wait for the SSL certificate to be issued and installed automatically.
- Once the SSL certificate is installed, you can verify it by visiting your website using “https://” instead of “http://”.
So yes, you can obtain a free SSL certificate on Namecheap by using Let’s Encrypt and installing it on your website.
The process is straightforward and can be done through your cPanel account.
Common issues you can encounter with Namecheap SSL (And how to fix them)
While Namecheap is a popular and reliable provider, navigating SSL certificates and potential issues can sometimes be tricky.
Here are some common issues you might encounter with Namecheap SSL and how to fix them:
1. SSL installation issues
- Symptom: Website doesn’t show as secure (“Not Secure” warning in the browser), even after installing the certificate.
- Possible fixes:
- Check for incorrect installation: Verify you’ve uploaded the certificate and private key to the correct server location and configured your server software according to Namecheap’s instructions.
- Clear browser cache and cookies: Old cached data can sometimes hold outdated information about your website’s security settings.
- Wait for DNS propagation: If you recently installed the certificate, it might take up to 24 hours for the changes to propagate across the internet.
- Contact Namecheap support: If you’ve tried the above steps and the issue persists, reach out to Namecheap’s support team for further assistance.
2. “Mixed content” warnings
- Symptom: Browser warns about “mixed content” after installing the SSL certificate, indicating some elements like images or scripts are still using HTTP instead of HTTPS.
- Possible fixes:
- Identify mixed content resources: Use your browser’s developer tools to identify the specific elements displaying the warning.
- Update internal links: Make sure all internal links (between pages on your website) use HTTPS instead of HTTP.
- Fix external links: If the mixed content is from external sources, you can’t directly fix it. Contact the website owner and encourage them to use HTTPS.
- Enable Force HTTPS: Some content management systems have a “Force HTTPS” option that automatically redirects all HTTP traffic to HTTPS.
3. Certificate chain problems
- Symptom: Browser displays an error message about an “incomplete certificate chain” or “untrusted issuer.”
- Possible fixes:
- Install intermediate certificates: Download and install the intermediate certificates provided by the Certificate Authority (CA) alongside the main certificate. Namecheap should provide instructions for this.
- Check server configuration: Ensure your server is configured to send the complete certificate chain to browsers.
- Contact Namecheap support: If the issue persists, reach out to Namecheap’s support team for assistance verifying the certificates and configuration.
4. Expired or revoked certificates
- Symptom: Browser displays a strong security warning, indicating the certificate is expired or revoked.
- Possible fixes:
- Renew your certificate: Don’t let your certificate expire! Purchase a renewal before the expiration date to avoid security vulnerabilities.
- Revoke compromised certificates: If your certificate has been compromised, revoke it immediately to prevent further security risks. Namecheap should offer revocation options in your account management.
- Install a new certificate: After resolving the expired/revoked certificate issue, install a new, valid certificate on your website.
5. Domain mismatch errors
- Symptom: Browser displays an error message indicating the certificate doesn’t match the domain name.
- Possible fixes:
- Verify domain name on certificate: Ensure you purchased the certificate for the correct domain name and haven’t made any typos.
- Check server configuration: Check that your server is sending the certificate for the appropriate domain.
- Contact Namecheap support: If the mismatch persists, contact Namecheap’s support team for assistance diagnosing the issue.
6. Namecheap SSL pending
If your SSL certificate is pending on Namecheap, there are a few things you can do to resolve the issue. Here are some steps you can take:
- Check the validation status: If your SSL certificate is pending, it may be because the validation process is not yet complete. You can check the validation status of your SSL certificate by logging into your Namecheap account and navigating to the “SSL Certificates” tab. If the validation status is “Pending,” you may need to complete additional steps to validate your domain.
- Resend the validation email: If you are using email validation, you may need to resend the validation email. To do this, log into your Namecheap account, navigate to the “SSL Certificates” tab, and click “Details” next to the certificate that requires validation. Then, click “Resend” to send the validation email again.
- Use alternative validation methods: If you are having trouble with email validation, you can try using alternative validation methods such as HTTP text file authentication or DNS validation. You can switch between validation methods by clicking “Edit methods” on the certificate details page.
- Contact support: If you have tried all of the above steps and your SSL certificate is still pending, you can contact Namecheap support for assistance. They will be able to help you troubleshoot the issue and get your SSL certificate activated as soon as possible.
Remember, these are just general guidelines. If you encounter any specific issues, Namecheap’s support team is your best resource for personalized assistance.
Don’t hesitate to reach out to them for prompt and helpful solutions.
Read also: