
An SSL (Secure Sockets Layer) certificate is a small data file that provides an extra layer of security between a website and a browser, ensuring that the connection to the site is secure and the data entered cannot be acquired by unintended parties.
HostGator, a popular hosting platform, offers SSL certificates to secure your website.
In this blog post, we will guide you through the process of obtaining an SSL certificate for your HostGator website.
How to choose the right SSL certificate for your website
Before you sit down to buy an SSL certificate on Hostgator, take a minute to pick the right one.
When choosing the right SSL certificate for your website, consider the validation level, secured domains, encryption strength, browser and device compatibility, cost, and additional features.
Here are some factors to consider when selecting an SSL certificate:
- Validation Level: SSL certificates can be categorized into three main trust levels: Extended Validation (EV), Organization Validated (OV), and Domain Validated (DV). EV certificates provide the highest level of trust, while DV certificates are more suitable for small- to medium-sized businesses seeking cost-effective security.
- Secured Domains: SSL certificates can be used to secure a single domain, multiple domains, or all of your domains and subdomains. Choose the certificate that aligns with your website’s security needs.
- Encryption Strength: SSL certificates offer different encryption strengths, such as 256-bit encryption on a 2048-bit root. Consider the level of encryption you need for your website.
- Browser and Device Compatibility: Ensure that the SSL certificate you choose is compatible with the major browsers and devices your users are likely to use.
- Cost: SSL certificates can vary in price, with some being more expensive than others. Consider your budget and the features offered by each certificate.
- Additional Features: Some SSL certificates may offer additional features, such as unlimited server licensing, strong encryption, and support for multiple browsers and devices.
This will help you select the SSL certificate that best meets your website’s security needs.
Prices of SSL on Hostgator
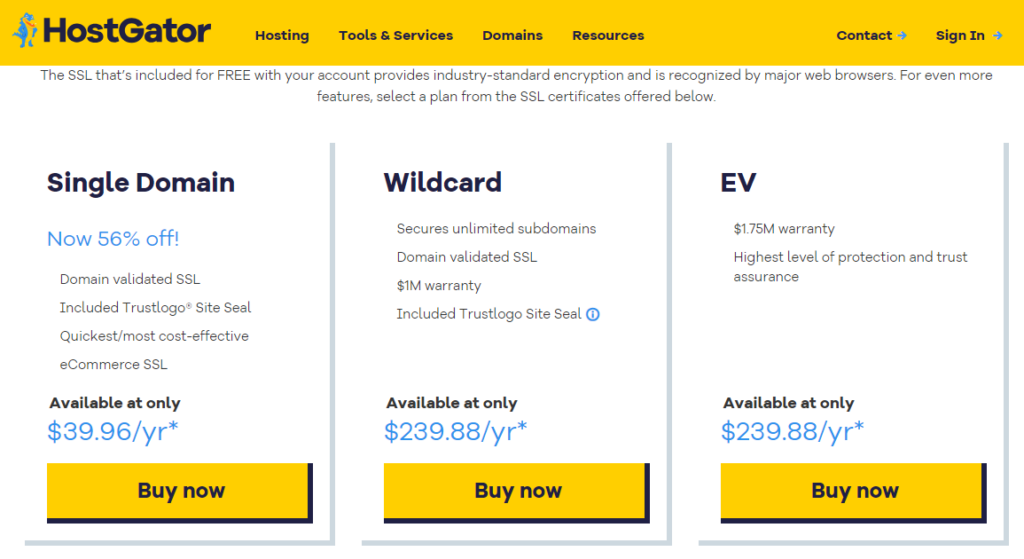
The prices of SSL certificates on HostGator vary based on the type of certificate. Here are some details:
- Positive SSL: The introductory price is $39.99 and renews at $69.99.
- Free SSL: HostGator offers a Free SSL that lasts 90 days from issuance and renews automatically at no cost.
- Single Domain SSL: The annual price is $39.96/yr.
- Wildcard SSL: The annual price is $239.88/yr.
How to Get an SSL Certificate on HostGator: A Step-by-Step Guide
Follow our simple step-by-step guide to secure your HostGator website with an SSL certificate. Build trust and protect sensitive data effectively.
Step 1: Purchase the SSL Certificate
The first step is to purchase the SSL certificate through a trusted provider, such as AskSSL.com.
This will ensure that you receive a high-quality certificate that has gone through the highest validation process.
Step 2: Generate a Certificate Signing Request (CSR)
Once you have purchased the SSL certificate, you will need to generate a CSR and private key.
To do this, fill out the details correctly in the provided CSR form on the HostGator website.
This will generate a certificate signing request along with the private key.
Step 3: Submit the CSR and Private Key to the SSL Provider
After generating the CSR and private key, you need to submit them to the SSL provider and complete the SSL configuration process.
This will involve providing additional information about your website and undergoing a domain validation process.
Step 4: Receive the SSL Certificate
Once the domain validation process is completed, the certificate authority will issue the certificate that you need to upload to the HostGator form for installation.
Step 5: Install the SSL Certificate on HostGator
The next phase is to install the SSL certificate on HostGator. To do this, follow these steps:
- Log in to the HostGator Customer Portal.
- Navigate to the Websites tab.
- Click on the Settings button of the website for which you want to install the SSL certificate.
- Select the certificate you purchased in the installation fees ($10) bracket.
After completing these steps, your website will be secure and display the “https://” protocol, indicating that the connection to the site is secure and the data entered cannot be acquired by unintended parties.
Benefits of SSL Certificates
SSL certificates provide several benefits, including:
- Secure connections: SSL certificates ensure that the connection to the site is secure, protecting your website visitors from potential security threats.
- Data protection: SSL certificates protect the data entered on your website, such as login credentials and personal information, from being intercepted by unintended parties.
- Improved search engine rankings: Websites with SSL certificates are favored by search engines like Google, which can lead to improved search engine rankings and increased visibility.
Obtaining an SSL certificate for your HostGator website is a simple and straightforward process.
The steps outlined above can help you ensure that your website is secure and protected from potential security threats.
Does Hostgator Offer Free SSL?
Yes, HostGator offers a free SSL certificate called Free SSL. This certificate is available for every domain that hosts with HostGator. The Free SSL lasts 90 days from issuance and renews automatically at no cost. To enable the Free SSL, follow these steps:
- Log in to the Plesk Control Panel.
- Go to the Websites & Domains tab.
- Click on Hosting Settings under the domain you want to enable the Free SSL for.
- Select the Free SSL option and click on the “Apply” button.
Please note that the Free SSL certificate is a Domain Validated (DV) certificate, which means it provides basic security and is suitable for small- to medium-sized businesses seeking cost-effective security.
If you require a higher level of security, you can consider purchasing a paid SSL certificate from HostGator.
Difference between a free SSL certificate and a paid SSL certificate on HostGator
Choosing between a free and paid SSL certificate on HostGator depends on your specific needs and website type. Here’s a breakdown of the key differences:
Features:
- Free SSL (Let’s Encrypt):
- Basic domain validation (DV) – verifies you control the domain, but not your identity.
- 90-day validity – requires frequent renewal.
- No warranty or green padlock in browser address bar.
- Suitable for personal websites, blogs, or non-critical projects.
- Paid SSL:
- Domain validation (DV), Organization validation (OV), or Extended validation (EV):
- DV: Similar to free SSL, but with optional paid add-ons like green padlock.
- OV: Verifies your business exists and controls the domain, increasing trust.
- EV: Highest level of verification, showing company name in green address bar, ideal for e-commerce or sensitive data.
- Validity periods from 1 to 2 years – fewer renewals.
- Some offer warranty for business losses due to certificate failure.
- Additional features like malware scanning and multi-domain support may be available.
- Domain validation (DV), Organization validation (OV), or Extended validation (EV):
Cost:
- Free SSL: Included with all HostGator hosting plans.
- Paid SSL: Varies depending on type and features, starting from around $6 per year.
Security:
Both free and paid SSL certificates encrypt communication between your website and visitors, protecting sensitive information.
However, paid SSL with higher validation levels offers increased trust and security for users, especially for businesses handling sensitive data or transactions.
Our Recommendation:
- Choose a free SSL:
- For personal websites or blogs with no sensitive data.
- If budget is a major constraint.
- Consider a paid SSL:
- For business websites, especially e-commerce.
- If you deal with sensitive data or want to build trust with customers.
- If you need features like warranty, green padlock, or multi-domain support.
Ultimately, the best choice depends on your individual needs and budget.
HostGator offers a variety of free and paid SSL certificates, so explore their options and choose the one that best suits your website.
Common SSL Issues on HostGator and How to Fix Them
Securing your website with an SSL certificate is crucial for building trust and protecting sensitive data.
However, even with a reliable hosting provider like HostGator, you might encounter occasional SSL issues.
Here are some common ones and how to troubleshoot them:
1. Expired SSL Certificate:
- Symptoms: You see warnings about an insecure connection or an invalid certificate. Browsers might display errors like “NET::ERR_CERT_DATE_INVALID.”
- Fix: Renew your SSL certificate before it expires. HostGator offers automatic renewal reminders, but it’s good practice to check manually as well. You can renew certificates through your HostGator control panel.
2. Incorrect Installation:
- Symptoms: Similar to an expired certificate, you might see connection errors or warnings about an invalid certificate.
- Fix: Double-check that you’ve installed the SSL certificate correctly for your domain and subdomains (if applicable). HostGator provides detailed guides on their website for different types of SSL installations. If unsure, contact their support team for assistance.
3. Mixed Content:
- Symptoms: You see warnings about mixed content, meaning some elements on your website are using HTTP instead of HTTPS. This can happen if you haven’t updated all links and resources to use HTTPS.
- Fix: Identify and update all instances of HTTP URLs to HTTPS in your website code, content, and plugins. Tools like “Mixed Content Scanner” can help automate this process.
4. DNS Propagation Delay:
- Symptoms: After installing or renewing your SSL certificate, it might take some time for the changes to propagate across the internet. This can lead to temporary connection errors.
- Fix: Be patient and allow up to 24 hours for DNS propagation to complete. If the issue persists beyond that, check your DNS settings and contact HostGator support if needed.
5. Third-Party SSL Issues:
- Symptoms: If you’re using a third-party SSL certificate instead of HostGator’s free or paid options, you might encounter specific issues related to that provider.
- Fix: Consult the documentation and support resources of your third-party SSL provider for troubleshooting steps. You might need to reinstall the certificate or contact their support team.
6. Hostgator SSL not working
If you are experiencing issues with SSL not working on your HostGator website, there could be several reasons for this. Here are some possible solutions to try:
- Check the certificate domain name: Ensure that the certificate domain name matches the URL you are visiting. You can view the certificate details in your browser to confirm this.
- Reinstall the SSL certificate: If the certificate is not installed correctly, you can try reinstalling it. This can be done by clicking on “View Certificates” when you get the error message and checking if Internet Options is not using SSL 3.0.
- Contact HostGator support: If the issue persists, it might be a good idea to contact HostGator support for assistance. They can help you troubleshoot the problem and ensure that your SSL certificate is correctly installed and functioning.
- Check for conflicts with other plugins or services: If you are using other plugins or services on your website, they might be causing conflicts with the SSL certificate. Try disabling them temporarily to see if the issue is resolved.
- Use a different SSL certificate: If the issue is with the SSL certificate itself, you can try using a different SSL certificate, such as Let’s Encrypt, which is offered by HostGator.
7. Hostgator SSL certificate expired
If your HostGator SSL certificate has expired, you can renew it to ensure that your website remains secure and functional. Here’s how to renew your SSL certificate:
- Check the SSL certificate status: Before renewing, make sure to check the status of your SSL certificate. You can do this by visiting an SSL checker tool, such as SSL Labs.
- Renew the SSL certificate: If your SSL certificate has expired, you can renew it by following these steps:
- Log in to your HostGator account.
- Go to the Plesk Control Panel.
- Navigate to the SSL/TLS section.
- Select the SSL certificate you want to renew and click on “Renew”.
- Wait for the renewal process: After initiating the renewal process, you will need to wait for the SSL certificate to be renewed. This usually takes a few minutes, but it can vary depending on the SSL provider.
- Verify the renewal: Once the SSL certificate has been renewed, you can verify it by visiting your website and checking the SSL certificate details in your browser. The certificate should now have a new expiration date.
If you are using a third-party SSL certificate, you may need to get it reinstalled on your website at HostGator.
If you still encounter issues after renewing the SSL certificate, consider contacting HostGator support for assistance.
Bonus Tip:
- Enable HSTS (HTTP Strict Transport Security): This security feature forces all connections to your website to use HTTPS, preventing accidental use of HTTP and potential security vulnerabilities. You can enable HSTS through your HostGator control panel.
Understanding these common SSL issues and knowing how to fix them can help you maintain a secure and trustworthy website for your visitors.
Remember, HostGator offers comprehensive support resources and a helpful team to assist you if you encounter any difficulties.
Read also: